You can often say a full thought faster than you can type it. If you want to learn how to use speech to text, start with your device’s built-in dictation, then choose a workflow that fits what you write.
We analyzed 61 comments and questions from Reddit, YouTube and Quora about using speech-to-text and found that 25% mentioned enabling dictation on devices.
Here’s how to switch it on, speak clearly, clean up a rough draft, and handle longer recordings on Windows or Mac. I’ll also cover the quick setup for phones, since the same basics apply.
Table of Contents
- Step 1: Choose where you want to dictate
- Step 2: Set up your microphone and start speech to text
- Step 3: Speak clearly and dictate punctuation
- Step 4: Turn a rough dictation into clean text
- Step 5: Improve speech-to-text accuracy over time
- Step 6: Use speech to text for live dictation or recordings
- FAQ: Using speech to text
- Conclusion
Step 1: Choose where you want to dictate
First, pick the text box where you want your words to appear. Most voice typing works wherever you can place a cursor, but some tools only work inside one app.
Try a short note before dictating a long email. Open Notepad, a Word document, a Google Doc, or an email draft. Click inside the text field so the cursor is visible. Then start dictation using the option that matches your device.
| Where you’re writing | How to start | Good fit for |
|---|---|---|
| Windows text field | Click the field, then press Windows key + H. | Notes, email, browser forms, and other quick drafts. |
| Apple Dictation | Built in on macOS. | macOS users. |
| Microsoft Word | Click in the document, then choose Dictate on the Home tab. | Writing directly in Word, with its own dictation controls. |
| Google Docs | Open Tools, then choose Voice typing. | People who do most of their writing in Google Docs. |
| Gboard | Use Gboard voice typing in an Android app. | Short messaging on mobile. |
| Mobile text field | Use your device’s dictation option. | Short replies or notes while using a text field. |
On Windows, the built-in shortcut is a handy first test. Windows Voice Typing and system-wide voice typing can fit different workloads: the built-in tool is quick to try, while a dedicated app may suit people who dictate across many programs.
For Samsung phones, open Settings, choose General management, then Samsung Keyboard settings. Find Voice input and select an available input method. For other mobile keyboards, look for a voice input setting.
On a phone, open a text field and use the device’s dictation option. Dictation can work alongside keyboard edits, so you can speak a sentence, fix a name by hand, then keep speaking.
Choose the simplest option that works in the app you use most. If a tool only appears in one document editor, it may not help when you switch to email or chat.
Step 2: Set up your microphone and start speech to text
Your goal is to make sure the computer hears you, then start dictating in the right field. The first time through, test with one sentence rather than a full page.
On Windows
Connect or select your microphone. Open a text field in Notepad, Word, or an email draft, then press Windows key + H. Wait until the voice typing panel says it’s listening before you speak. Press the shortcut again or use the panel to stop.
Standard Windows voice typing needs an internet connection, a working microphone, and an active text box. Windows voice typing uses online speech recognition.
On Mac
Open System Settings, choose Keyboard, then turn on Apple Dictation. Check the selected language and shortcut. The exact key can vary with your Mac and settings, so use the shortcut shown on that screen. Click into a text field before triggering Dictation.
If nothing appears, check which microphone your Mac is using. Open Sound settings and confirm the right input is selected. Then check that the app has microphone access if macOS asks for permission.
In Word, put the cursor in the document and select Dictate on the Home tab. In Google Docs, open Tools and choose Voice typing. If you’re using either app’s own dictation feature, don’t start the system-level tool at the same time.
Typally is another option when you want to speak into different Windows or Mac apps without hunting for a separate dictate button each time. Its free plan includes 100 minutes of dictation per month, and it types at the cursor in the app you’re using.
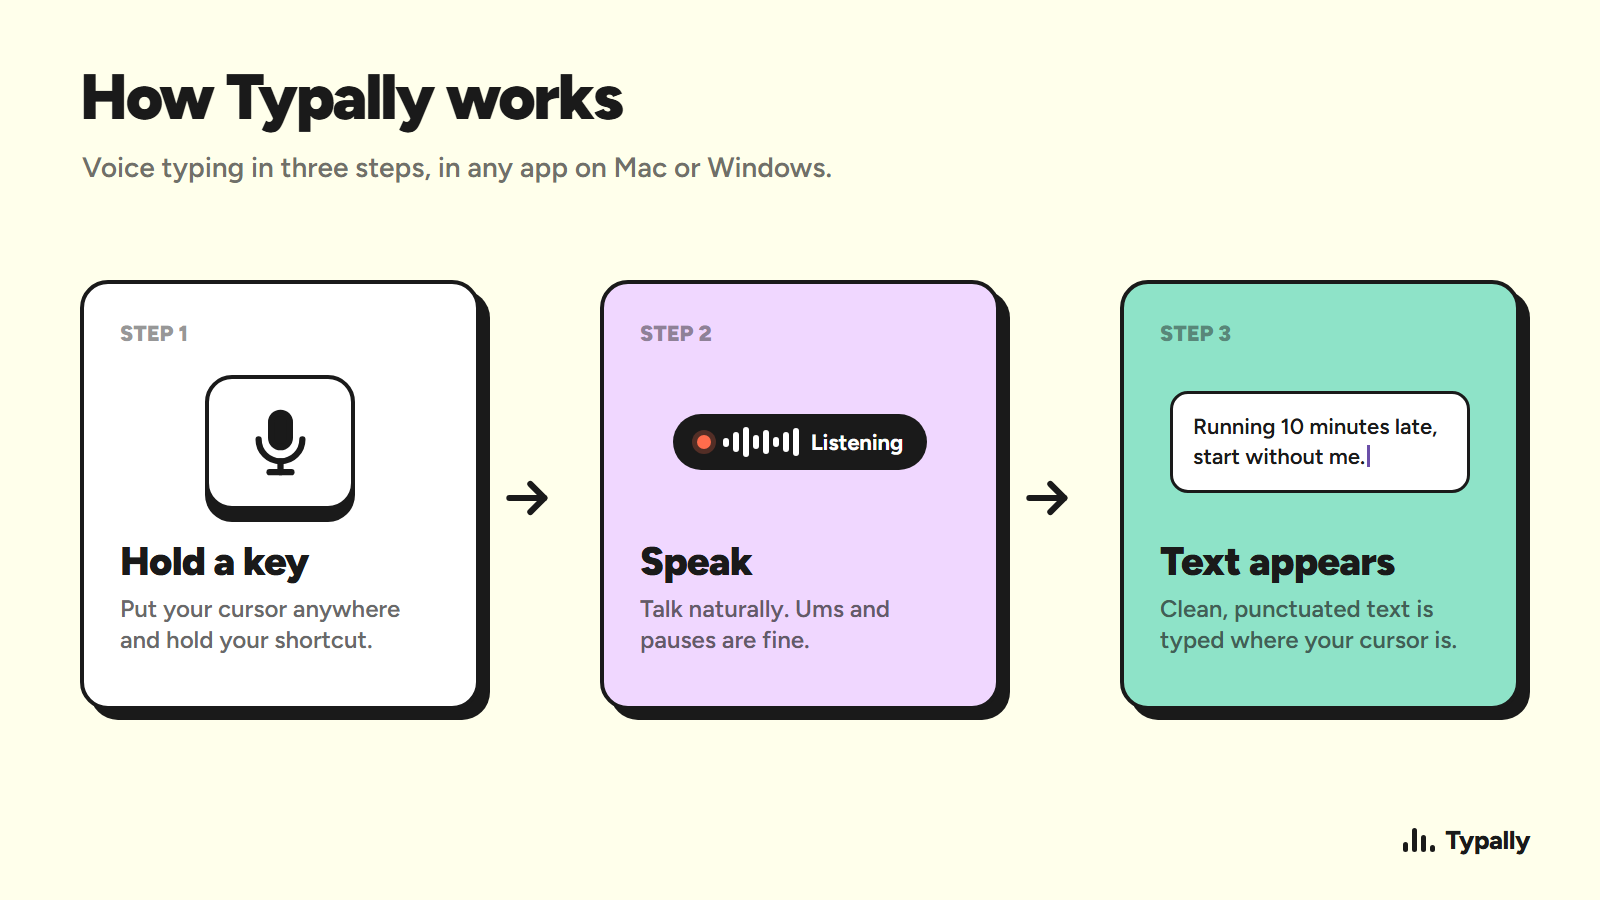
For a quick browser test, you can also use Typally’s free online voice-to-text tool, no signup needed. Allow microphone access when your browser asks, speak a short sentence, and check the result before copying it elsewhere.
If the microphone icon is missing, make sure a text field is active and that dictation is enabled in the device settings. If the icon appears but no words show, check the selected input device and microphone permissions. On Windows, confirm your internet connection too.
Check before you continue: You should be able to dictate a short test sentence and stop listening without losing the text.
Step 3: Speak clearly and dictate punctuation
Speak in complete thoughts, at a steady pace. You don’t need to sound like a newsreader. Leave a small pause between ideas so you can catch a wrong word before moving on.
Try speaking punctuation when the tool doesn’t add it the way you want. Say “comma” or “period” where those marks belong. Use “question mark” for a question. To break up text, say “new line” or “new paragraph.” Commands can vary by app and language, so test the ones you plan to use.
For example, you might say: “Hi Maya comma new paragraph Can we move the review to Thursday question mark.” A voice tool may insert the marks as you speak, or it may type the command as a word. If that happens, check the app’s command help and use the keyboard to make the break.
Short phrases are easier to steer than a long stream of thought. Dictate one idea, pause, and read what appeared. If you spot a mistake, fix it before adding another paragraph. This is especially useful for dates, names, email addresses, and amounts.
Some tools support spoken edits too. You may be able to say “delete that” or “select that,” while Word’s Dictate controls can include formatting commands. Don’t assume every app accepts the same words. Open its help panel once and learn the commands you’ll use most.
For a bullet list, dictate the heading first. Then start each item on a new line, or use the app’s list command if it supports one. In Word, formatting controls can help shape a list as you speak. In a basic text field, it may be faster to dictate each point on its own line and add bullets afterward.
Keep sensitive details in mind. Dictation may process audio on your device or through a cloud service, depending on the tool and settings. For personally identifying or confidential details, typing is the safer choice.
If punctuation keeps going wrong, turn off automatic punctuation for a test and speak each mark aloud. If the tool then types “comma” as text, switch the setting back and use the app’s supported voice commands.
Step 4: Turn a rough dictation into clean text
Think of speech recognition as a fast first draft, not a final proofread. Spoken language has starts, repeats, and side notes that can look clumsy on screen.
Imagine dictating this: “Um, can you, uh, send the new draft to Priya, actually, no, send the outline first, and ask if she can review it tomorrow.” A cleaned version could read: “Please send Priya the outline first. Ask if she can review it tomorrow.” The key is to check that the shorter text still says what you meant.
Read the result once with your eyes on the screen. Focus on words that can change the meaning: names, dates, negations such as “not,” and numbers. Speech tools can hear two similar-sounding words differently, especially when the surrounding sentence gives little context.
Use a quick edit pass
- Fix meaning first. Correct names, numbers, and any word that changes the request.
- Remove speech clutter. Cut repeated words and filler phrases when they don’t add meaning.
- Shape the layout. Break long thoughts into paragraphs, then add a list or heading if it helps the reader.
- Read it once more. Make sure the final text still sounds like you.
For an email, dictate the main point before polishing the greeting or sign-off. For an update to a team, say the status first, then the next action. A useful order makes editing easier because you’re not trying to solve sentence style and message structure at once.
Typally aims to turn speech into cleaner text, and it tracks filler words and vocabulary over time. That can help you notice habits in your speech as you write. Still, review any edited output before sending it, especially when a sentence carries a deadline or decision.
Don’t force every spoken sentence into formal prose. A quick chat reply can stay casual. A customer response may need a clearer opening and a direct next step. The person reading it matters as much as the words the software heard.
For a long prompt to an AI assistant, say the goal first, then give the limits and the format you want. After dictating, check names of tools or files and make sure the final instruction is clear. One misheard “don’t” can send the answer in the wrong direction.
Keep your first edit pass small. Fix what changes meaning, remove clutter, and then decide if the message needs more polish.
Step 5: Improve speech-to-text accuracy over time
Good accuracy starts with clear audio and a useful test routine. Sit close enough to the microphone for your voice to stand out. If you’re using a headset or external mic, check that the computer selected it.
Clean audio and a well-positioned microphone help with everyday dictation. Keep the mic near you, reduce competing noise where you can, and speak at a steady pace.
Next, test words the tool often gets wrong. Use your own names, work terms, product names, and acronyms in a short sentence. If the same word keeps coming out wrong, check whether your app supports a custom vocabulary or dictionary. Typally includes custom vocabulary, which can help with terms you say often.
Don’t try to fix every accuracy issue by speaking unnaturally slowly. Say the whole phrase clearly, then pause before the next thought. A word surrounded by useful context is often easier to recognize than a single term spoken alone.
- Test in the room where you usually dictate.
- Check the selected microphone when you change devices.
- Use the correct language setting for your speech.
- Review recurring errors and add terms to custom vocabulary when available.
- Try a short sample before a long message or recording.
Accuracy also depends on the job. A quick search can tolerate a small typo. A client email, report, or long AI prompt needs a careful check. If you dictate a lot, build that check into your routine instead of waiting until a mistake causes confusion.
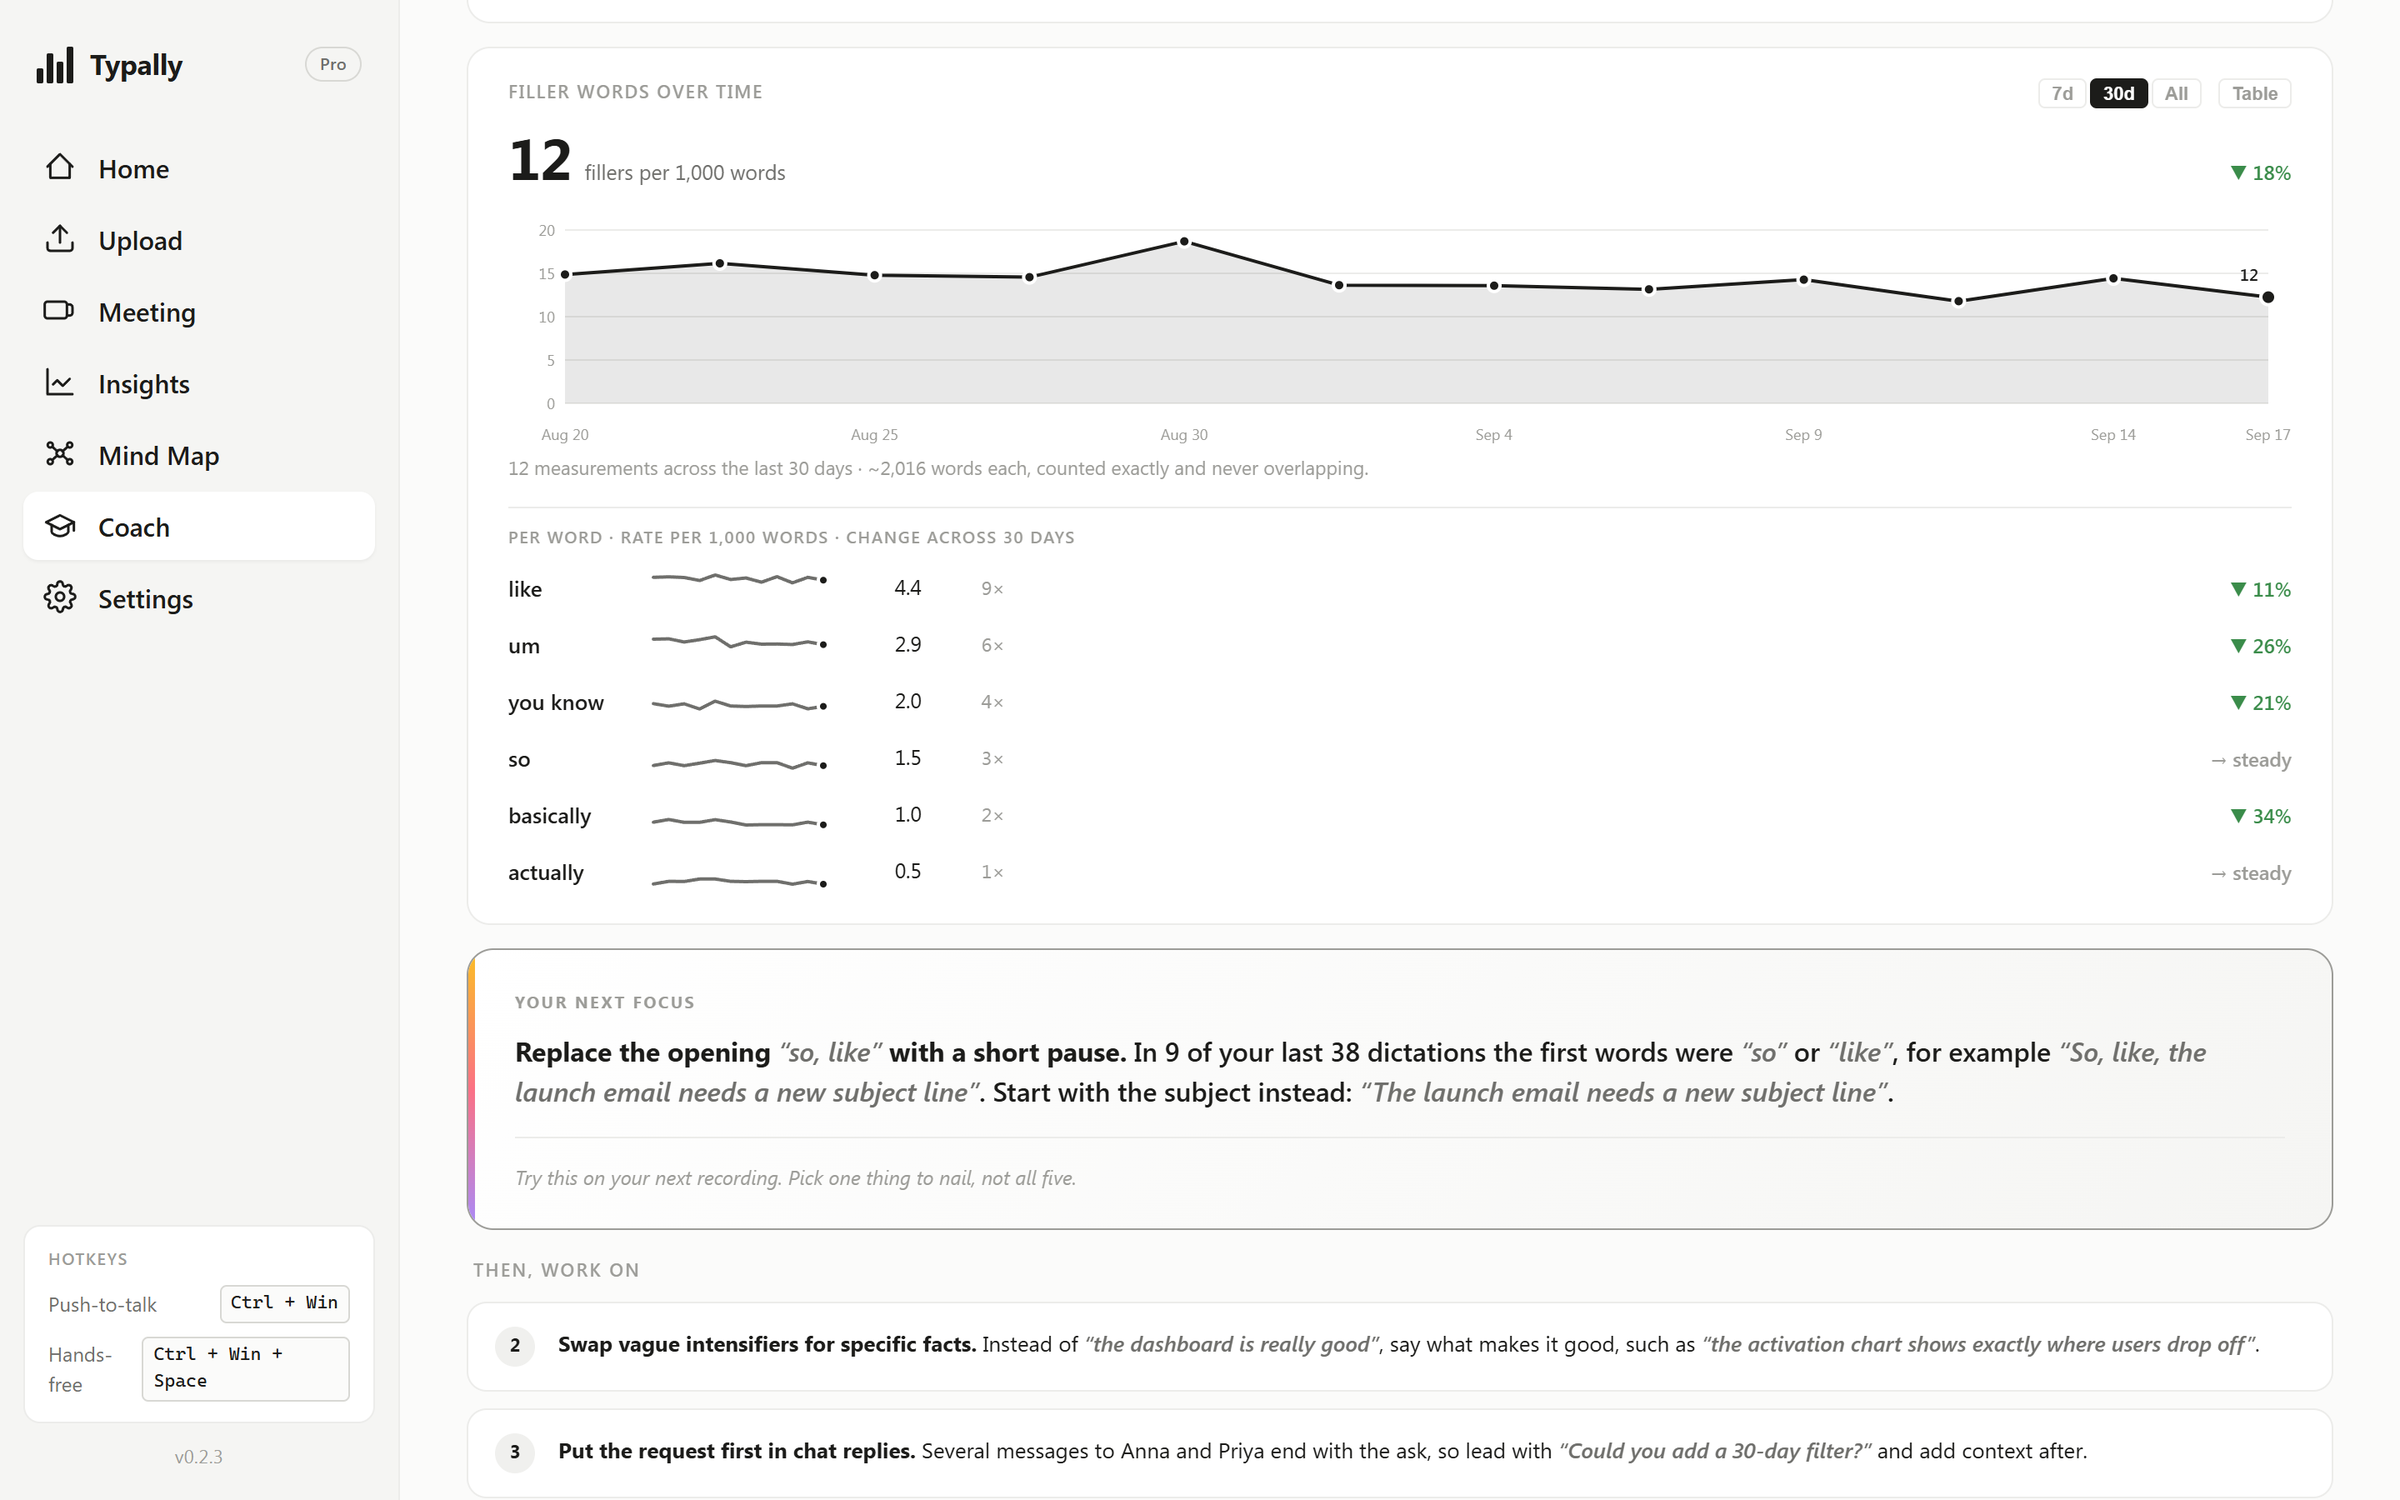
Typally tracks filler words and vocabulary so you can spot patterns as you keep dictating. You might notice that you often say “um” while thinking through a point. That’s useful feedback for your speaking practice, but the goal isn’t to erase every pause. Focus on changes that make your message easier to follow.
Privacy is part of accuracy planning too. Find out whether your chosen tool processes audio locally or online before you dictate confidential material. Windows voice typing uses online speech recognition for its standard mode; some newer Windows features have different processing requirements.
If a clean test sentence still comes out wrong, check the microphone and language first. Then test another text field. That helps you tell a device setup problem from an app-specific issue.
Step 6: Use speech to text for live dictation or recordings
Live dictation and recording transcription solve different tasks. Live dictation puts your words into an active text box as you speak. File transcription starts with audio you already recorded and turns it into text afterward.
Use live dictation for an email, a note, a support reply, or a prompt you’re writing now. Click the exact field first. In Word, select Dictate. In Google Docs, open Voice typing. In Notepad or many email fields, use your computer’s built-in dictation shortcut.
For an AI prompt, speak the request in parts. State the task, add the context, then say what to leave out or how to format the answer. Pause between parts and reread the prompt before sending it. That final look can catch a missing constraint or a misheard product name.
Use file transcription when you have a voice memo, interview, lecture, or meeting recording. You can turn an audio recording into text with Typally’s free tool, then review the transcript and copy what you need. A recording may include pauses or more than one speaker, so expect to edit before using it as a polished document.
For a meeting, decide what you need before you transcribe. A full transcript helps when exact wording matters. A short set of decisions and follow-up tasks may be easier to review when you only need the outcome. Don’t treat a transcript as a verified record until you’ve checked names and key points against the audio.
Live tools are built around your active microphone and cursor. Recording tools work with existing audio files. If you try to use a live dictation shortcut on a saved recording, it won’t transcribe that file; choose a file transcription workflow instead.
Keep the source audio until you’ve checked the transcript, especially if you’ll quote it or share it. That gives you a way to confirm a hard-to-hear phrase rather than guessing from the text alone.
FAQ: Using speech to text
How do I turn on speech to text on Windows?
Click in a text field and press Windows key + H to open voice typing. Wait until it shows that it’s listening, then speak. You’ll need a working microphone and an internet connection for standard Windows voice typing. If the tool opens but doesn’t hear you, check the selected microphone and confirm the cursor is still in the text field.
How do I turn on dictation on a Mac?
Apple Dictation is free and built into macOS. Open System Settings, choose Keyboard, turn on Dictation, then click in a text field and press the shortcut shown in that setting.
Can I use speech to text in Word and Google Docs?
Yes. In Word, click inside the document and choose Dictate from the Home tab. In Google Docs, open Tools and select Voice typing. Both options work within the document, while Windows or Mac system dictation can be useful in other text fields. Use one dictation feature at a time to avoid competing microphone controls.
Why is the microphone icon missing?
The microphone icon may be missing because dictation is off, the keyboard’s voice input is disabled, or the app doesn’t have microphone permission. On Windows or Mac, check the system’s dictation settings and active input device. On Samsung, check Voice input under Samsung Keyboard settings. Also make sure you’ve clicked a field where text can be entered.
How can I make speech to text more accurate?
Use the right microphone, speak clearly, and set the correct language. Give names or unfamiliar terms some context, then check them in the result. If your tool supports custom vocabulary, add words you use often. Review the final text before sending it, especially when it contains a date, amount, name, or instruction that could change the meaning.
Conclusion
Start with your device’s built-in dictation and test it in the app where you write most. When you want the same voice typing in every app, download Typally free: hold a key, say it, and Typally types clean text in any app on Windows or Mac. The free plan includes 100 minutes a month.